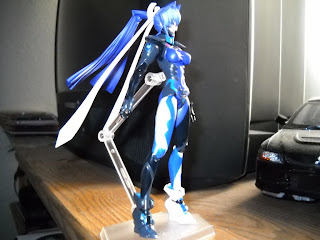
Whoa, it's been a hectic couple of weeks for me as a figma fan. First Yui and Ui are announced and preorders for Yui have now been closed. Fortunately I was able to secure one. Mio was announced earlier this week and I hope I'll be able to secure a preorder for her as well. I guess I'll see on friday when it officially opens.
Now onto what I've been working on this week. I decided to get started on the arms for my Figma Meiya repaint. I did the usual cleaning and some light sanding to prep the arms. Then I separated the arms and proceeded to paint them white.
It took quite a few coats of paint since I didn't primer the arms before hand. After letting it dry for a day, I masked it for when I put some coats of blue down. The tape I'm using sux and I need some better tape. There's quite a bit of leftover tape and some seeped paint on the shoulder patches.
Anyway, looks alright for now. I can just touch up and clean up the bits later down the line. I still need to paint the hands and the other leg. Then I can give the parts to my friend Eddy who has painted the body for me.
Showing posts with label repaint. Show all posts
Wednesday, January 20, 2010
Wednesday, January 13, 2010
Star Wars Transformer Magna Guard
One of the best cross overs in toy brands is the Star Wars Transformers crossover. These are just the Star Wars vehicles seen in the movies given the ability to transform into a robot. A truly smart move by Hasbro. My friend Hsunami Prime did a review of one and had a favorable impression of it. That piqued my curiosity and after buying a Magna Guard fighter for him as a present, I soon succumbed to that curiosity and opened the toy.
All in all it's pretty solid as a Transformer toy. It's simple and prone to some parts popping out, but very efficient in transforming into it's fighter mode. The parts are all flushed and fit in nicely and the weapons storage in fighter mode is very impressive. The robot mode is pretty good, but I had one major issue with it. The head isn't painted silver like it's chest.
That's quite annoying to me and so I thought of painting it silver since I had the paint. Before that though, I noticed that the back of the hands could use some painting while I was at it.
So, first up was painting the head silver. I went all out and painted the entire head silver, even the eyes.
Once the silver was dry I painted the eyes gold and the stripe on the top of its head gold to match. Then I thought that the missiles on it's shoulders would look good with gold tips. I then painted those gold and put a silver base below the it as an accent.
I then painted the back of the hands gold to match the color scheme. While I was at it I painted the tips of the missiles in its guns gold, but ran out of paint then.
Now the cool thing about the missiles on its shoulders is that it forms his staff. With the tips painted gold, it adds to the look of the staff once formed.
Of course in fighter mode, the gold stands out and adds to it's overall look.
So there it is, my Magna Guard transformer. Since it was meant as a present for my friend, I went and bought another one before I hung out with him. When I did, I told him to compare the one I painted with the normal one and choose which one to keep. Of course he took the one that I painted like I'd hope. I was then able to go home and happily paint the second one. All in all it was just a simple modification but, it added a lot to the Magna Guard toy.
All in all it's pretty solid as a Transformer toy. It's simple and prone to some parts popping out, but very efficient in transforming into it's fighter mode. The parts are all flushed and fit in nicely and the weapons storage in fighter mode is very impressive. The robot mode is pretty good, but I had one major issue with it. The head isn't painted silver like it's chest.
That's quite annoying to me and so I thought of painting it silver since I had the paint. Before that though, I noticed that the back of the hands could use some painting while I was at it.
So, first up was painting the head silver. I went all out and painted the entire head silver, even the eyes.
Once the silver was dry I painted the eyes gold and the stripe on the top of its head gold to match. Then I thought that the missiles on it's shoulders would look good with gold tips. I then painted those gold and put a silver base below the it as an accent.
I then painted the back of the hands gold to match the color scheme. While I was at it I painted the tips of the missiles in its guns gold, but ran out of paint then.
Now the cool thing about the missiles on its shoulders is that it forms his staff. With the tips painted gold, it adds to the look of the staff once formed.
Of course in fighter mode, the gold stands out and adds to it's overall look.
So there it is, my Magna Guard transformer. Since it was meant as a present for my friend, I went and bought another one before I hung out with him. When I did, I told him to compare the one I painted with the normal one and choose which one to keep. Of course he took the one that I painted like I'd hope. I was then able to go home and happily paint the second one. All in all it was just a simple modification but, it added a lot to the Magna Guard toy.
Friday, January 1, 2010
FIgma Meiya repaint part 1
Happy New Year! My first post of the year and with a new year comes a new project. I've mentioned before that I planned a repaint and got my friend Eddy to help me out with it. He is painting the flesh parts for me, since it's a little intricate for my noobish skills, and I'm painting the limbs. Here's a preview.
For my past customs, I've always used water based Acrylic paints. However, for Meiya, Eddy uses Model Master Acrylic paint to paint the body and so I'm trying out the same paint. The thing is that Eddy is much more experienced, very professional, and he has the right tools such as an airbrush. All I have are a couple of brushes and so trying out new paint will lead to some mistakes. Anyway, it's good learning experience for me. Aother note is that he has my Meiya figma and all I was able to take home was the leg. So here's the leg on my other Meiya figma which I have at home.
So there it is. The leg is still not done though and still needs some white. It also needs some touch ups and detailing. There's also the rest of the figma, such as the limbs, to do. So that's my Meiya figma and this is how it starts.
Tuesday, December 22, 2009
Custom Project status update
Right. A bit of an update as to where I stand with the rest of my projects. I've got some stuff primered as can be seen below. Figma Archetype She being prep for painting. I've got a couple of swords primed that will turn into black rock shooter Miku's dual black blades. Finally, I've got the 2 legs primed for my ROTF Sunstorm.
I came up with a design for a lightsaber broadsword and I've taken the parts, primed it, painted it, and modded a gundam beam saber for the blade.
I've also got a re-paint that's so intricate that I've enlisted the help of my friend Eddy, owner of Toyslogic. He's been nice enough to educate me on various paints, thinners, and different painting techniques to help me improve my skills. The project he's helping me on is something I've planned months ago, but my skills aren't enough to get it done. I'll be making a post of that one as I get some stuff done on my end. Have a Happy Holidays to all the folks out there.
Black Rock Shooter Miku Figma part 5
It's a bit of a hectic week with the holidays and all that, but what little spare time I have has been devoted to planning and working on some projects. So for my custom figma, Black Rock Shooter Miku, I've been checking out the weapons of Black Rock Shooter and she has both a black blade and a rock cannon. Below is a pic by Huke.
So, if my Miku is "borrowing" BRS's abilities, then she should also have a black blade (or two) and a rock cannon. That's why today I got started on Miku's Rock Cannon.
Like the name implies, it should be a cannon like weapon. Meaning big and powerful. I ended using the cannon off of my 1/100 scale Astrea. I started off by giving it a base coat of chrome silver.
I then let it dry. Based on the pics of BRS I've seen, the handle and trigger is inside the rear of the cannon. This means that BRS has almost half her arm inside the rear of the cannon.
That's where I stand so far for this project. After I finish painting the cannon, I'll start on the black blades. Then I'll do the touch ups on Miku and fix her coat. Finally, her bare arms are prepped and primed for painting. I don't have a lot of time right now due to the holidays and all that, but it's still fun planning and thinking of creative ways to achieve what I envisioned.
Wednesday, December 16, 2009
Black Rock Shooter Miku Figma part 4
Yay, I'm at the home stretch. I got around to making the belt for my custom figma. I took a bit of time to brain storm and gather some materials for my Black Rock Shooter Miku. I knew I needed a belt and using a rubber band again like I did for the boot flaps would work. However, the belt buckle is a different story.
I went through some old gundam parts and I found a backpack that was used on the EZ8. It has what seems like vinyl straps with plastic buckles for adjusting the straps.
I took the buckles and found them to be too big to use for my custom figma. So, the obvious route for me was to re-size it so that it would fit. What I did was cut the bottom side off, trim the remaining bits until the belt could fit, then glue the bottom side to the remaining part. As can be seen below, the modded buckle is now smaller compared to the original and can now fit my custom figma.
After resolving the size issue, I went about painting the buckle silver and the belt white. Again, I used Tamiya Acrylic paint which served me well.
After it dried, I glued the belt onto miku's shorts. I fit the buckle in before gluing the rest of the belt onto the shorts. The results looked pretty good.
Then I brainstormed on how I can make the bra top for miku's chest. After all, black rock shooter didn't go around topless. I was going to used some black latex, but dirt and stuff tend to stick, so the final result may not look good. Then I remembered about the vinyl strap on the backpack. I took that and cut 2 triangles, a short strap, and a long strap and glued those onto miku's chest.
The glue I use doesn't take long to dry so after about a minute of waiting I put miku together to see what the final result looks like.
Oh yeah, not bad at all.
But it's still not finished. I noticed some paint rubbing off the shorts that needs to be touched up. I also need to replace the figma joints on the knees and the ponytails.
I'm also in the process of making some bare arms for swapping out the coat sleeved arms. That way I can take the coat off and her arms would be none sleeved. It's been a great learning experience so far and I'm glad I'm at the home stretch on this custom.
Saturday, December 12, 2009
Choun White
Here's a project that I did over the summer. When I picked up my Ikki Tousen Choun figure, I was quite surprised at how green it was.
Here she is with my Macross Frontier Sheryl Nome. With shot of the back and the "lift up" feature.
After showing this to my buddy Hsunami Prime, he also commented on how green she was. He also pointed out in the pre production photos that her armor color was a light grey and almost white. This made me wonder how she would look in a white and gold color scheme. Upon hearing that, Hsu said that he'd like to see Choun in those colors. So, I took up the challenge and gave it a try.
That was a good start and I thought that maybe it wasn't such a good idea, but I kept at it and the results were pretty good.
The right side of Choun's shoulder armor is still green and unpainted. It's hard to paint it with her hair in the way and can only be done by taking her apart. So, I decided to leave it in a weird quirky sort of way. I also didn't paint her feet for similar reasons and I think leaving some green in is alright.
I learned some things while doing this re-paint and it was a very good practice for when or if I get into building resin kits. All in all I like her in the white color and I feel it better matches her than the green.
Subscribe to:
Posts (Atom)